前言:
在界面放一个TextView 与 +1 的Button 和 -1 的Button
ViewModel的使用
视频链接
控件初始化
1
2
3
4
5
6
private TextView textView;
private Button btn1, btn2;
textView = findViewById(R.id.textView);
btn1 = findViewById(R.id.button);
btn2 = findViewById(R.id.button2);创建一个MyViewModel类 继承自ViewModel
1
2
3
public class MyViewModel extends ViewModel {
public int number = 0;
}在MainActivity 中 实例化这个MyViewModel类对象
这里要通过 ViewModelProdiver(owner: ).get()方法实例化
1
2
private MyViewModel myViewModel;
myViewModel = new ViewModelProvider(MainActivity.this).get(MyViewModel.class);在Button的点击事件中 修改Model中的数据 ,再通知TextView修改文本
1
2
3
4
5
6
7
8
9
10
11
12
13
14btn1.setOnClickListener(new View.OnClickListener() {
public void onClick(View v) {
myViewModel.number++;
textView.setText(String.valueOf(myViewModel.number));
}
});
btn2.setOnClickListener(new View.OnClickListener() {
public void onClick(View v) {
myViewModel.number+=2;
textView.setText(String.valueOf(myViewModel.number));
}
});使用ViewModel的优点:
在旋转屏幕时,能够保存TextView中的数据,而不需要调用OnsaveInstance方法 来保存数据,简化代码
LiveData的使用
视频链接
控件初始化
1
2
3
4
5
private TextView number;
private Button add,sub;
number = findViewById(R.id.number);
add = findViewById(R.id.button_add);
sub = findViewById(R.id.button_sub);创建一个MyViewModel 类 继承自 ViewModel 并且 里面存放的是 LiveData 类型的对象 ,这种数据类型,可以让我们在Avtivity中设置一个监听者,当这个对象值发生改变时,自动将数据传到View
1
2
3
4
5
6
7
8
9
10
11
12
13
14
15
public class ViewModelWithLiveData extends ViewModel {
private MutableLiveData<Integer> LikedNumber;
public MutableLiveData<Integer> getLikedNumber() {
if(LikedNumber==null){
LikedNumber = new MutableLiveData<>();
LikedNumber.setValue(0);
}
return LikedNumber;
}
public void addLiked(int n){
LikedNumber.setValue(LikedNumber.getValue() + n);
}
}在MainActivity 中 实例化这个MyViewModel类对象,并对 这个对象所保存的数据 进行监听(观察)
这里要通过 ViewModelProdiver(owner: ).get()方法实例化 同上
1
2
3
4
5
6
7
8
viewModelWithLiveData = new ViewModelProvider(MainActivity.this).get(ViewModelWithLiveData.class);
//***********************监听数据变化
viewModelWithLiveData.getLikedNumber().observe(this, new Observer<Integer>() {
public void onChanged(Integer integer) {
number.setText(String.valueOf(integer));
}
});对Button的事件 进行处理,通过调用Model中的add方法 修改LiveData数据 就会触发监听器
1
2
3
4
5
6
7
8
9
10
11
12
13add.setOnClickListener(new View.OnClickListener() {
public void onClick(View v) {
viewModelWithLiveData.addLiked(1);
}
});
sub.setOnClickListener(new View.OnClickListener() {
public void onClick(View v) {
viewModelWithLiveData.addLiked(-1);
}
});
DataBinding的使用
视频链接
修改build.gradle(model:app),支持dataBinding
1
2
3
4
5
6
7
8
9
10
11
12
13
14
defaultConfig {
applicationId "com.littlestone.databindingpractice"
minSdkVersion 16
targetSdkVersion 30
versionCode 1
versionName "1.0"
testInstrumentationRunner "androidx.test.runner.AndroidJUnitRunner"
// 加入 dataBinding 的使用
dataBinding{
enabled true
}
}创建一个MyViewModel 类 继承自 ViewModel 并且 里面存放的是 LiveData 类型的对象,编写 get函数 以及 add函数
1
2
3
4
5
6
7
8
9
10
11
12
13
14
15
public class MyViewModel extends ViewModel {
private MutableLiveData<Integer> LiveNumber;
public MutableLiveData<Integer> getLiveNumber() {
if(LiveNumber==null){
LiveNumber = new MutableLiveData<>();
LiveNumber.setValue(0);
}
return LiveNumber;
}
public void addOne(){
LiveNumber.setValue(LiveNumber.getValue()+1);
}
}在MainActivity中 创建一个MyViewModel 类对象 并初始化
1
2
3
private ActivityMainBinding binding;
//实例化 mviewModel
myViewModel = new ViewModelProvider(this).get(MyViewModel.class);将布局文件 修改为 Databinding类型 ,这里不需要手动修改,将光标移动到布局文件的根布局下,弹出小灯泡 点击提示 create databinding layout,系统就会创建一个对应这个布局的类 ActivityMainBinding,类名前半部分就是布局名
1
2
3
4
5
6
7
8
9
10
11
12
13
14
15
16
17
18
19
20
21
22
23
24
25
26
27
28
29
30
31
32
33
34
35
36
37
38
39
40<layout xmlns:android="http://schemas.android.com/apk/res/android"
xmlns:app="http://schemas.android.com/apk/res-auto"
xmlns:tools="http://schemas.android.com/tools">
<!--关键-->
<data>
</data>
<androidx.constraintlayout.widget.ConstraintLayout
android:layout_width="match_parent"
android:layout_height="match_parent"
tools:context=".MainActivity">
<!--text的引用方式-->
<TextView
android:id="@+id/textView"
android:layout_width="wrap_content"
android:layout_height="wrap_content"
android:text="@{String.valueOf(data.LiveNumber)}"
android:textSize="24sp"
app:layout_constraintBottom_toBottomOf="parent"
app:layout_constraintHorizontal_bias="0.498"
app:layout_constraintLeft_toLeftOf="parent"
app:layout_constraintRight_toRightOf="parent"
app:layout_constraintTop_toTopOf="parent"
app:layout_constraintVertical_bias="0.206" />
<!--Button的点击事件-->
<Button
android:id="@+id/button"
android:layout_width="wrap_content"
android:layout_height="wrap_content"
android:text="+1"
android:onClick="@{()->data.addOne()}"
app:layout_constraintBottom_toBottomOf="parent"
app:layout_constraintEnd_toEndOf="parent"
app:layout_constraintStart_toStartOf="parent"
app:layout_constraintTop_toTopOf="parent" />
</androidx.constraintlayout.widget.ConstraintLayout>
</layout>在布局文件中 标签下 添加一个 变量
1
2
3
4
5
6
<!--关键-->
<data>
<variable
name="data"
type="com.littlestone.databindingpractice.MyViewModel" />
</data>修改Text的 text 展示方式
1
android:text="@{String.valueOf(data.LiveNumber)}"
修改Button的点击触发事件
1 | 注意 引用方式 先写@{},在{}中 添加()-> 变量名.方法 |
在MainActivity中 初始化 ActivityMainBinding,给XML 中的data传一个对象,声明所属
1
2
3
4
5
6
7
8
9
10
11
12
13
14
15
16
17
18
19public class MainActivity extends AppCompatActivity {
private ActivityMainBinding binding;
private MyViewModel myViewModel;
protected void onCreate(Bundle savedInstanceState) {
super.onCreate(savedInstanceState);
//实例化 mviewModel
myViewModel = new ViewModelProvider(this).get(MyViewModel.class);
//初始化 binding
binding = DataBindingUtil.setContentView(this,R.layout.activity_main);
//给XML 中的data传一个对象过去
binding.setData(myViewModel);
//声明所属
binding.setLifecycleOwner(this);
}
}
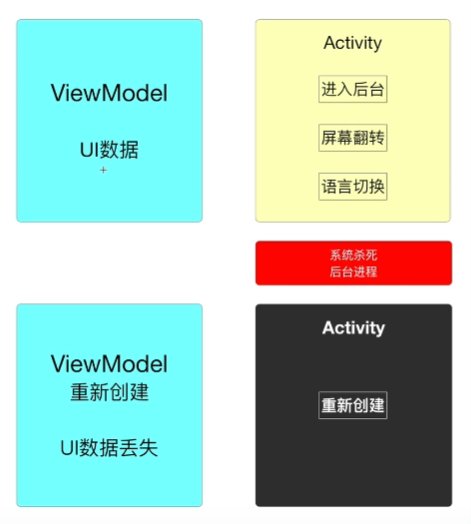
数据持久化存储
使用
OnSaveInstanceState()方法,该方法会在Activity被destroy前被调用,OnSaveInstanceState()方法携带了一个Bundle 类型的参数 Bundle参数提供了一系列的方法用于保存数据(key,value),在Oncreate 方法中,如果之前调用了OnSaveInstanceState(),参数就不为空了,就可以通过使用
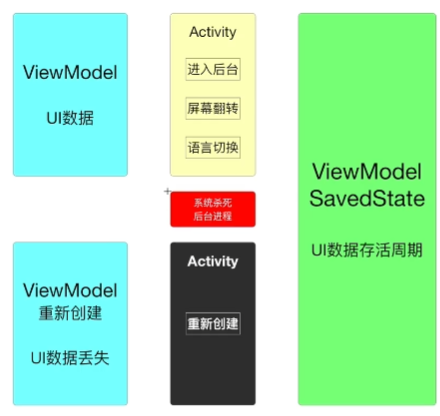
SharedPreferences,使用editor 存数据,注意editor,使用SharedPreferences读数据在ViewModel中使用
SavedStateHandle, 这个参数有 set方法 handle.set(key,value), handle.getLiveData(key)添加依赖
1
implementation "androidx.lifecycle:lifecycle-viewmodel-savedstate:2.3.0"
ViewModel 代码
需要注意 Viewmodel的构造方法
1
2
3
4
5
6
7
8
9
10
11
12
13
14
15
16
17
public class MyViewModel extends ViewModel {
private SavedStateHandle handle;
public MyViewModel(SavedStateHandle handle) {
this.handle = handle;
}
public MutableLiveData<Integer> getNumber(){
if(handle.contains(MainActivity.NUMBER_VAL)==false){
handle.set(MainActivity.NUMBER_VAL,0);
}
return handle.getLiveData(MainActivity.NUMBER_VAL);
}
public void addOne(){
getNumber().setValue(getNumber().getValue()+1);
}
}Activity 代码
注意实例化ViewModel 时的代码
1
2
3
4
5
6
7
8
9
10
11
12
13
14
15
16
17
public class MainActivity extends AppCompatActivity {
public final static String NUMBER_VAL="NUMBER";
private MyViewModel myViewModel;
private ActivityMainBinding binding;
private MyApplication myApplication;
protected void onCreate(Bundle savedInstanceState) {
super.onCreate(savedInstanceState);
binding = DataBindingUtil.setContentView(this,R.layout.activity_main);
//*******************注意***********************
//需要我们定义一个Application类 ViewModel的构造方法需要
myViewModel = new ViewModelProvider(this,new SavedStateViewModelFactory(myApplication,this)).get(MyViewModel.class);
binding.setData(myViewModel);
binding.setLifecycleOwner(this);
}
}Application 代码
1
2
3
4
5
6
7
8
9
10
11
12
13
public class MyApplication extends Application {
private static Context context;
public void onCreate() {
super.onCreate();
context = getApplicationContext();
}
public static Context getContext(){
return context;
}
}