在 再探 NavigationController —-页面传递数据更简单中,我们通过使用Bundle来传递数据,在本节 我们将总结 多个Fragment 如何共享数据,其实就是ViewModel 与 Fragment的结合
效果图
分析上述效果图
我们需要将界面一的值 传到界面二,界面二对值进行+1 或者 -1 将更新后的值 传回 界面一,我们可以通过上一节讲的Buddle 来进行传递数据,也可以通过我们之前所讲的ViewModel 来存放这个数据,这时候就不是界面之间传值,而是两个界面对一个数据的共同访问,
我们之间学到的Viewmodel,dataBingding都是在Activity中实例化,在Fragment中实例化 又有所不同,见本文最后 总结部分
实现步骤
1. 实现MyViewModel类
这里和普通的ViewModel使用没有差别
1
2
3
4
5
6
7
8
9
10
11
12
13
14
15
16
17
18
| public class MyViewModel extends ViewModel {
private MutableLiveData<Integer> number;
public MutableLiveData<Integer> getNumber() {
if (number == null) {
number = new MutableLiveData<>();
number.setValue(0);
}
return number;
}
public void add(int x) {
number.setValue(number.getValue() + x);
if (number.getValue() < 0) {
number.setValue(0);
}
}
}
|
2. 编写两个Fragment 布局 以及 对应的类
布局资源
FragmentHome xml
要注意 TextView 中的Text 需要String类型

1
2
3
4
5
6
7
8
9
10
11
12
13
14
15
16
17
18
19
20
21
22
23
24
25
26
27
28
29
30
31
32
33
34
35
36
37
38
39
40
41
42
43
44
45
46
47
48
49
50
51
52
53
54
55
| <?xml version="1.0" encoding="utf-8"?>
<layout xmlns:android="http://schemas.android.com/apk/res/android"
xmlns:app="http://schemas.android.com/apk/res-auto"
xmlns:tools="http://schemas.android.com/tools">
<data>
<variable
name="data"
type="com.littlestone.navigationpractice3.MyViewModel" />
</data>
<androidx.constraintlayout.widget.ConstraintLayout
android:layout_width="match_parent"
android:layout_height="match_parent"
tools:context=".HomeFragment">
<TextView
android:id="@+id/textView"
android:layout_width="wrap_content"
android:layout_height="wrap_content"
注意这里 需要将Int转String
android:text="@{String.valueOf(data.number)}"
android:textSize="30sp"
app:layout_constraintBottom_toBottomOf="parent"
app:layout_constraintEnd_toEndOf="parent"
app:layout_constraintHorizontal_bias="0.526"
app:layout_constraintStart_toStartOf="parent"
app:layout_constraintTop_toTopOf="parent"
app:layout_constraintVertical_bias="0.154" />
<SeekBar
android:id="@+id/seekBar"
android:layout_width="0dp"
android:layout_height="wrap_content"
android:max="10"
app:layout_constraintBottom_toBottomOf="parent"
app:layout_constraintEnd_toEndOf="parent"
app:layout_constraintHorizontal_bias="0.502"
app:layout_constraintStart_toStartOf="parent"
app:layout_constraintTop_toTopOf="parent"
app:layout_constraintVertical_bias="0.308" />
<Button
android:id="@+id/button"
android:layout_width="wrap_content"
android:layout_height="wrap_content"
android:text="Button"
这里并没有 执行Viewmodel中的方法,是因为 这个按钮并不与值相关,只是切换界面的
app:layout_constraintBottom_toBottomOf="parent"
app:layout_constraintEnd_toEndOf="parent"
app:layout_constraintStart_toStartOf="parent"
app:layout_constraintTop_toTopOf="parent"
app:layout_constraintVertical_bias="0.443" />
</androidx.constraintlayout.widget.ConstraintLayout>
</layout>
|
FragmentHome.java
1
2
3
4
5
6
7
8
9
10
11
12
13
14
15
16
17
18
19
20
21
22
23
24
25
26
27
28
29
30
31
32
33
34
35
36
37
38
39
40
41
42
43
44
45
46
47
48
49
50
51
52
53
54
55
| public class HomeFragment extends Fragment {
private MyViewModel myViewModel;
private FragmentHomeBinding binding;
public HomeFragment() {
}
@Override
public void onCreate(Bundle savedInstanceState) {
super.onCreate(savedInstanceState);
}
@Override
public View onCreateView(LayoutInflater inflater, ViewGroup container,
Bundle savedInstanceState) {
myViewModel = new ViewModelProvider(getActivity()).get(MyViewModel.class);
binding = DataBindingUtil.inflate(inflater, R.layout.fragment_home, container, false);
binding.setData(myViewModel);
binding.setLifecycleOwner(getActivity());
binding.seekBar.setProgress(myViewModel.getNumber().getValue());
binding.seekBar.setOnSeekBarChangeListener(new SeekBar.OnSeekBarChangeListener() {
@Override
public void onProgressChanged(SeekBar seekBar, int progress, boolean fromUser) {
myViewModel.getNumber().setValue(progress);
}
@Override
public void onStartTrackingTouch(SeekBar seekBar) {
}
@Override
public void onStopTrackingTouch(SeekBar seekBar) {
}
});
binding.button.setOnClickListener(new View.OnClickListener() {
@Override
public void onClick(View v) {
NavController controller = Navigation.findNavController(v);
controller.navigate(R.id.action_homeFragment_to_detailFragment);
}
});
return binding.getRoot();
}
}
|
第二个界面
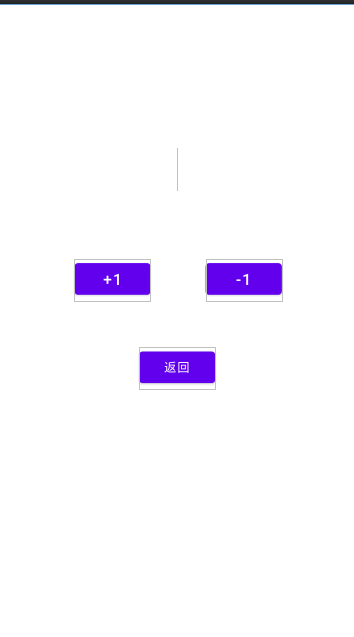
这里有两个对数据进行更新的Button,所以这两个Button需要执行Viewmodel中的add函数,另一个Button事件由Fragment负责
1
2
3
4
5
6
7
8
9
10
11
12
13
14
15
16
17
18
19
20
21
22
23
24
25
26
27
28
29
30
31
32
33
34
35
36
37
38
39
40
41
42
43
44
45
46
47
48
49
50
51
52
53
54
55
56
57
58
59
60
61
62
63
64
65
66
67
68
69
70
71
72
| <?xml version="1.0" encoding="utf-8"?>
<layout xmlns:android="http://schemas.android.com/apk/res/android"
xmlns:app="http://schemas.android.com/apk/res-auto"
xmlns:tools="http://schemas.android.com/tools">
<data>
<variable
name="data"
type="com.littlestone.navigationpractice3.MyViewModel" />
</data>
<androidx.constraintlayout.widget.ConstraintLayout
android:layout_width="match_parent"
android:layout_height="match_parent"
tools:context=".DetailFragment">
<TextView
android:id="@+id/textView2"
android:layout_width="wrap_content"
android:layout_height="wrap_content"
android:text="@{String.valueOf(data.number)}"
android:textSize="36sp"
app:layout_constraintBottom_toBottomOf="parent"
app:layout_constraintEnd_toEndOf="parent"
app:layout_constraintHorizontal_bias="0.498"
app:layout_constraintStart_toStartOf="parent"
app:layout_constraintTop_toTopOf="parent"
app:layout_constraintVertical_bias="0.243" />
<Button
android:id="@+id/button2"
android:layout_width="wrap_content"
android:layout_height="wrap_content"
android:text="+1"
********************************注意******************************
android:onClick="@{()->data.add(1)}"
android:textSize="18sp"
app:layout_constraintBottom_toBottomOf="parent"
app:layout_constraintEnd_toEndOf="parent"
app:layout_constraintHorizontal_bias="0.27"
app:layout_constraintStart_toStartOf="parent"
app:layout_constraintTop_toTopOf="parent"
app:layout_constraintVertical_bias="0.43" />
<Button
android:id="@+id/button3"
android:layout_width="wrap_content"
android:layout_height="wrap_content"
android:text="-1"
********************************注意******************************
android:onClick="@{()->data.add(-1)}"
android:textSize="18sp"
app:layout_constraintBottom_toBottomOf="parent"
app:layout_constraintEnd_toEndOf="parent"
app:layout_constraintHorizontal_bias="0.738"
app:layout_constraintStart_toStartOf="parent"
app:layout_constraintTop_toTopOf="parent"
app:layout_constraintVertical_bias="0.43" />
<Button
android:id="@+id/button4"
android:layout_width="wrap_content"
android:layout_height="wrap_content"
android:text="返回"
app:layout_constraintBottom_toBottomOf="parent"
app:layout_constraintEnd_toEndOf="parent"
app:layout_constraintStart_toStartOf="parent"
app:layout_constraintTop_toTopOf="parent"
app:layout_constraintVertical_bias="0.579" />
</androidx.constraintlayout.widget.ConstraintLayout>
</layout>
|
3. 创建DataBinding ,并修改Fragment 布局 文件
代码 见上
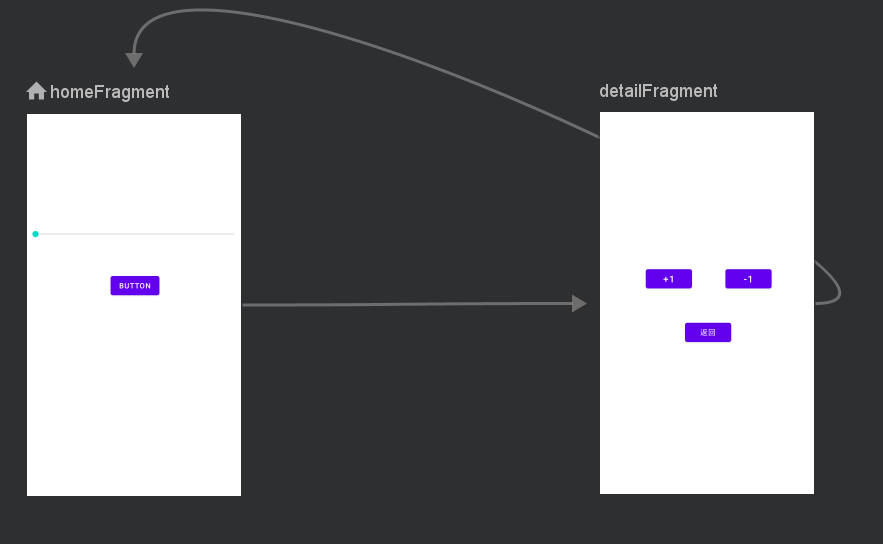
4. 创建NavGraph
右击res–New–Android Resource File ,在Resource Type中 选择 Navigation
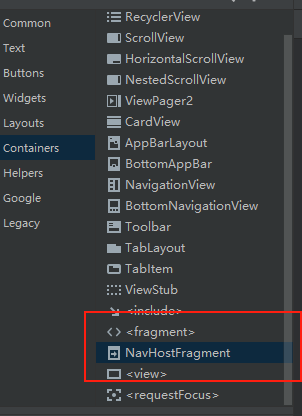
5.在Activity main layout中 添加 NavHostFragment
6.在Fragment类中 实例化MyViewModel类 ,与 DataBinding类
总结
1.不论是在Activity,还是Fragment ,对于ViewModel的初始化是大部分一样的,
有一点需要注意 就是ViewModelProvider 中的参数 Fragment是getActivity(),而 Activity直接就是this
1
| myViewModel = new ViewModelProvider(this).get(MyViewModel.class);
|
1
| myViewModel = new ViewModelProvider(getActivity()).get(MyViewModel.class);
|
2. 对于Databinding的初始化 是不一样的
对于Activity:在Oncreate中写
1
2
3
| binding = DataBindingUtil.setContentView(this,R.layout.activity_main);
binding.setData(myViewModel);
binding.setLifecycleOwner(this);
|
对于Fragment ,在OncreateView中写
1
2
3
| binding = DataBindingUtil.inflate(inflater, R.layout.fragment_home, container, false);
binding.setData(myViewModel);
binding.setLifecycleOwner(getActivity());
|